Hey there, fellow sweet tooth! I can’t tell you how excited I am to share this recipe for the *most delightful Easter sweets*. Seriously, these cookies are a game changer for your holiday celebrations! There’s just something magical about baking during Easter—maybe it’s the fresh blooms outside or the anticipation of gathering with family and friends. Whatever it is, these cookies perfectly capture that joy!
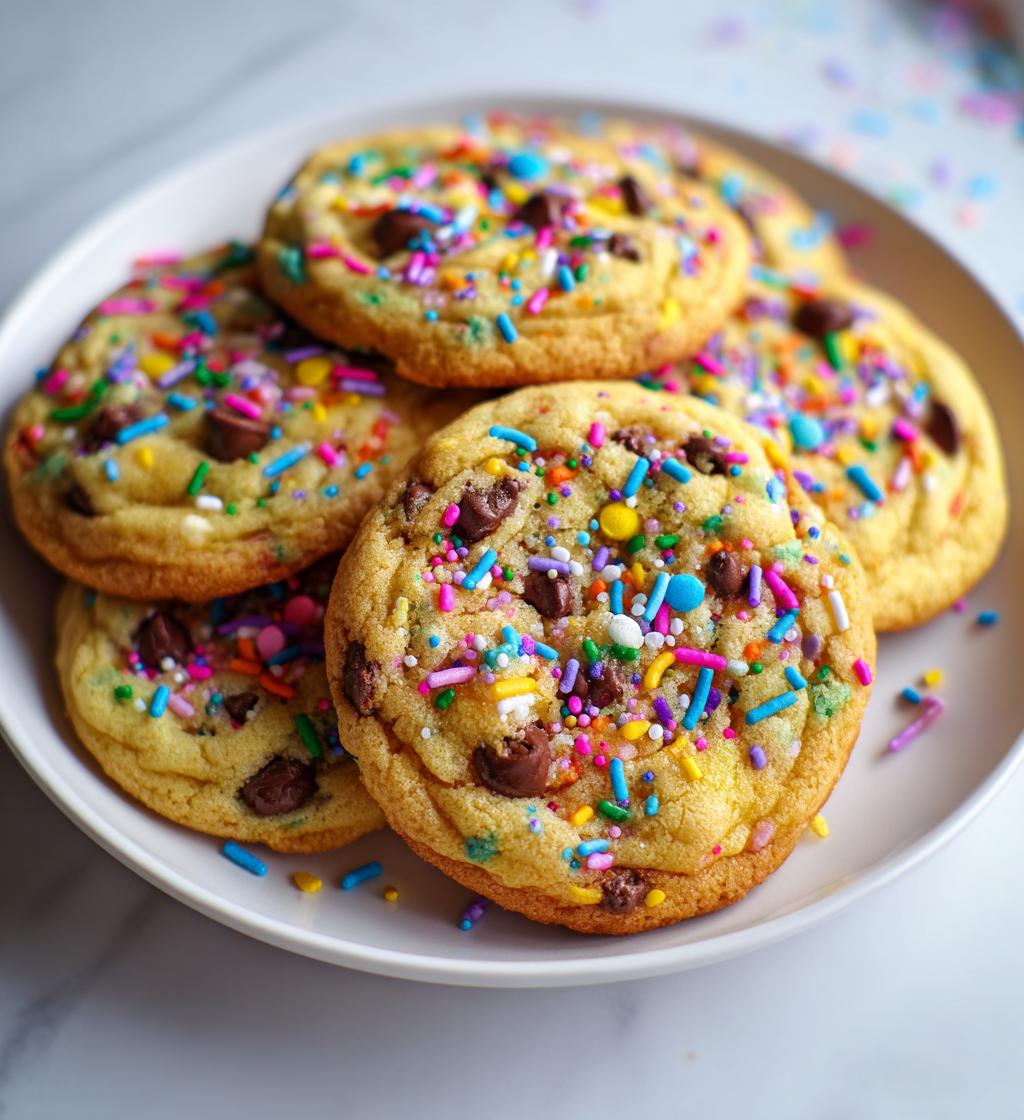
What makes these Easter sweets stand out? Well, they’re not just your ordinary cookies. They’re bursting with chocolate chips and colorful sprinkles that bring a festive flair to any dessert table. Plus, they’re super easy to whip up, making them a perfect choice for both seasoned bakers and those just starting out. You’ll have a batch ready in no time, and trust me, the smiles on your loved ones’ faces will be worth it!
So, if you’re ready to dive into some sweet, sugary fun, let’s get started on these delicious Easter sweets that will have everyone asking for seconds!
Ingredients List
Here’s everything you’ll need to create these scrumptious Easter sweets! Each ingredient plays a vital role in making these cookies deliciously irresistible.
- 1 cup sugar: This is your sweet base! Granulated sugar will give the cookies their lovely sweetness and that delightful chewy texture.
- 1/2 cup unsalted butter: Make sure it’s softened to room temperature for easy creaming with the sugar. This adds richness and flavor!
- 2 large eggs: These bind the ingredients together and help the cookies rise. Fresh eggs work best!
- 1 teaspoon vanilla extract: A splash of vanilla enhances the overall flavor, making these cookies taste even better.
- 1 1/2 cups all-purpose flour: This is the backbone of your cookie dough. Sift it for a lighter texture if you’d like!
- 1 teaspoon baking powder: This little leavening agent will help your cookies puff up beautifully.
- 1/2 teaspoon salt: Just a pinch brings out the flavors, balancing the sweetness perfectly.
- 1 cup chocolate chips: Go for semi-sweet or milk chocolate, depending on your preference. You can’t have too many chocolate chips!
- 1/2 cup sprinkles: These add a festive touch and fun crunch to your cookies. Feel free to use a mix of colors!
Gather all these ingredients, and you’ll be ready to create some magical Easter sweets that everyone will adore!
How to Prepare Easter Sweets
Alright, let’s roll up our sleeves and get baking these fabulous Easter sweets! Follow these simple steps, and soon your kitchen will be filled with the heavenly aroma of freshly baked cookies. Trust me, it’s worth the wait!
- Preheat the oven: First things first, you’ll want to preheat your oven to 350°F (175°C). This step is crucial because it ensures your cookies bake evenly. So, don’t skip it!
- Cream the sugar and butter: In a large mixing bowl, combine the 1 cup of sugar and 1/2 cup of softened unsalted butter. Using an electric mixer or a sturdy wooden spoon, beat them together until the mixture is light and fluffy. This should take about 3-5 minutes. You’re looking for a creamy texture that almost looks like whipped cream!
- Add eggs and vanilla: Crack in the 2 large eggs one at a time, mixing well after each addition. Then, add in the 1 teaspoon of vanilla extract. This step is where the magic happens, and your batter starts to come together!
- Mix dry ingredients: In a separate bowl, whisk together the 1 1/2 cups of all-purpose flour, 1 teaspoon of baking powder, and 1/2 teaspoon of salt. This helps to evenly distribute the leavening agent and salt, so your cookies rise perfectly.
- Combine wet and dry ingredients: Gradually add the dry mixture to your wet ingredients, stirring until just combined. Don’t overmix here! You want to see a few flour streaks still visible. Overmixing can lead to tough cookies, and we definitely don’t want that!
- Fold in chocolate chips and sprinkles: Now comes the fun part! Gently fold in the 1 cup of chocolate chips and 1/2 cup of colorful sprinkles. Make sure they’re evenly distributed throughout the dough.
- Drop the dough: Using a spoon or cookie scoop, drop spoonfuls of dough onto a baking sheet lined with parchment paper. Leave some space between each cookie because they’ll spread a little while baking. I usually aim for about 2 inches apart!
- Bake to perfection: Pop the baking sheet into your preheated oven and bake for 10-12 minutes. Keep an eye on them! You’ll know they’re done when the edges turn golden brown, while the centers look slightly soft. They’ll continue to firm up as they cool.
- Cool before serving: Once baked, take the cookies out and let them cool on the baking sheet for about 5 minutes before transferring them to a wire rack. This cooling time helps them set up perfectly without falling apart. Patience is key here!
And there you have it! Your scrumptious Easter sweets are ready to be enjoyed. Just wait for the smiles when everyone takes that first bite!
Nutritional Information
Now, let’s talk about the goodness packed into these delightful Easter sweets! Each cookie is a little burst of joy, but it’s always good to know what you’re indulging in. Here’s a breakdown of the estimated nutritional values for one cookie:
- Calories: 150
- Fat: 7g
- Saturated Fat: 4g
- Unsaturated Fat: 2g
- Trans Fat: 0g
- Cholesterol: 20mg
- Sodium: 100mg
- Carbohydrates: 20g
- Fiber: 1g
- Protein: 2g
- Sugar: 10g
Keep in mind that these values are estimates and can vary based on specific ingredients used. But hey, a little sweetness is all part of the fun during Easter, right? Enjoy every delicious bite!
Why You’ll Love This Recipe
This recipe for Easter sweets is not just about the cookies; it’s about the joy they bring to your celebrations! Here are a few reasons why you’re going to adore these treats:
- Quick and easy: With just 15 minutes of prep time, you can whip up these cookies in a flash! Perfect for those last-minute baking urges.
- Deliciously flavorful: The combination of chocolate chips and sprinkles creates a delightful burst of flavor and texture in every bite. Trust me, you won’t be able to stop at just one!
- Perfect for celebrations: These festive cookies add a cheerful touch to any Easter gathering or springtime party. They’re sure to impress your family and friends!
- Kid-friendly: This recipe is a hit with the little ones! They’ll love helping you mix the dough and, of course, decorating with sprinkles!
- Customizable: Want to switch things up? Feel free to experiment with different types of chocolate or seasonal sprinkles to make these cookies uniquely yours!
So, whether you’re celebrating with family, hosting a brunch, or just treating yourself, these Easter sweets are a must-bake!
Tips for Success
Alright, let’s make sure your Easter sweets turn out perfectly every time! Here are some practical tips and tricks to help you avoid common pitfalls and keep your baking game strong:
- Room temperature ingredients: Make sure your butter and eggs are at room temperature before you start. This helps them blend together smoothly, ensuring a light and fluffy cookie dough.
- Don’t overmix: When combining your wet and dry ingredients, be gentle! Stir just until everything is combined. Overmixing can lead to tough cookies, and we want them soft and chewy!
- Use parchment paper: Lining your baking sheet with parchment paper not only helps prevent sticking but also makes cleanup a breeze. Who doesn’t love an easy cleanup?
- Watch the baking time: Keep an eye on your cookies as they bake! Ovens can vary, so check them a minute or two earlier than the suggested time to prevent burning. Remember, they’ll continue to firm up while cooling!
- Let them cool: Patience is key! Allow your cookies to cool on the baking sheet for a few minutes before transferring them to a wire rack. This helps them set up properly and prevents them from falling apart.
- Experiment with flavors: Don’t be afraid to mix things up! Add a pinch of cinnamon or a dash of almond extract for a unique twist. Your taste buds will thank you!
- Store properly: To keep your cookies fresh, store them in an airtight container at room temperature. They’ll last for several days, but trust me, they’ll be gone before you know it!
With these tips in your back pocket, you’re all set to create some magnificent Easter sweets that will have everyone coming back for more. Happy baking!
Variations
If you’re like me, you love to play around with recipes and make them your own! These Easter sweets are incredibly versatile, so let’s shake things up a bit with some fun variations. Here are a few ideas to get your creative juices flowing:
- Different chocolate types: Why stick to just one kind of chocolate? Try using dark chocolate chips for a richer flavor, or white chocolate chips for a sweeter twist. You could even mix them together for an exciting combination!
- Fruit add-ins: Consider adding some dried fruit like cranberries or chopped apricots to the dough for a chewy surprise in every bite. They’ll add a lovely pop of color and a hint of tartness that complements the sweetness perfectly.
- Nutty goodness: For those who love a little crunch, toss in some chopped nuts! Walnuts or pecans would bring a delicious texture and flavor contrast to these cookies. Just be sure to chop them finely so they mix in nicely!
- Flavored extracts: Take the flavor up a notch by swapping out the vanilla extract for almond or coconut extract. Just a teaspoon can transform the flavor profile and make your cookies stand out!
- Seasonal sprinkles: While colorful sprinkles are a must for Easter, you can switch them out based on the season! Use fall-themed sprinkles for Thanksgiving or heart-shaped ones for Valentine’s Day—get festive, and have fun with it!
- Cookie sandwiches: For a fun twist, turn these cookies into sandwiches! Spread a layer of frosting or even a scoop of ice cream between two cookies for a delightful treat that’s sure to impress.
These variations not only keep things interesting but also let you tailor the cookies to your taste or the occasion. So, feel free to experiment and make these Easter sweets your own. Happy baking!
Storage & Reheating Instructions
Once you’ve baked these delightful Easter sweets, you’ll want to make sure they stay fresh and delicious! Here’s how to properly store your cookies and keep that scrumptious flavor intact.
Storing leftovers: To keep your cookies fresh, place them in an airtight container at room temperature. This will help maintain their soft and chewy texture. If you’re planning to enjoy them over several days, you can also layer them between sheets of parchment paper to prevent sticking.
But if you find yourself with an abundance of cookies (lucky you!), you can freeze them! Just let them cool completely, then place them in a freezer-safe bag or container. They’ll stay good for up to three months. When you’re ready to indulge, simply thaw them at room temperature for a few hours or pop them in the microwave for about 10-15 seconds to warm them up quickly.
Reheating tips: If you prefer your cookies warm and gooey, reheating is the way to go! To maintain that delightful softness, I suggest using the microwave. Just heat them for about 10-15 seconds, and they’ll be deliciously warm without drying out. Alternatively, you can reheat them in a preheated oven at 350°F (175°C) for about 5 minutes. This method keeps the edges crisp while warming the center perfectly.
So, whether you’re enjoying these Easter sweets fresh from the oven or savoring them days later, following these storage and reheating tips will ensure every bite is as delightful as the first. Happy munching!
FAQ Section
Got questions about these delicious Easter sweets? Don’t worry, I’ve got you covered! Here are some common queries I hear from fellow bakers, along with my answers to make your baking experience even smoother.
- Can I use margarine instead of unsalted butter? While you can use margarine, I highly recommend sticking with real unsalted butter for the best flavor and texture. Butter provides that rich taste that makes these Easter sweets so special!
- What can I substitute if I don’t have chocolate chips? No chocolate chips? No problem! You can add chopped chocolate bars, white chocolate, or even butterscotch chips for a fun twist. Or, if you want to keep it simple, you could skip the chocolate altogether and add extra sprinkles instead!
- How can I make these cookies gluten-free? To make these Easter sweets gluten-free, simply substitute the all-purpose flour with a 1:1 gluten-free flour blend. Just make sure it contains xanthan gum, which helps mimic the texture of regular flour!
- Can I prepare the dough ahead of time? Absolutely! You can make the dough in advance and store it in the refrigerator for up to 2 days. Just be sure to cover it tightly. When you’re ready to bake, scoop it onto the baking sheet and bake as directed!
- How do I know when the cookies are done baking? Great question! You’ll want to look for golden edges and slightly soft centers. They’ll continue to firm up as they cool, so don’t worry if they seem a bit underbaked when you pull them out!
Hopefully, these answers help you feel more confident while making your Easter sweets! If you have any other questions, feel free to reach out. Happy baking!
Print
Easter sweets: 7 Irresistible Treats for Joyful Celebrations
- Total Time: 27 minutes
- Yield: 24 cookies 1x
- Diet: Vegetarian
Description
Delicious Easter sweets perfect for celebrating the holiday.
Ingredients
- 1 cup sugar
- 1/2 cup unsalted butter
- 2 large eggs
- 1 teaspoon vanilla extract
- 1 1/2 cups all-purpose flour
- 1 teaspoon baking powder
- 1/2 teaspoon salt
- 1 cup chocolate chips
- 1/2 cup sprinkles
Instructions
- Preheat the oven to 350°F (175°C).
- In a bowl, cream the sugar and butter together.
- Add the eggs and vanilla extract, mixing well.
- In another bowl, combine flour, baking powder, and salt.
- Gradually add the dry ingredients to the wet mixture.
- Fold in the chocolate chips and sprinkles.
- Drop spoonfuls of dough onto a baking sheet.
- Bake for 10-12 minutes until golden.
- Let cool before serving.
Notes
- Store in an airtight container.
- Use different colored sprinkles for a festive look.
- These sweets can be made ahead of time.
- Prep Time: 15 minutes
- Cook Time: 12 minutes
- Category: Dessert
- Method: Baking
- Cuisine: American
Nutrition
- Serving Size: 1 cookie
- Calories: 150
- Sugar: 10g
- Sodium: 100mg
- Fat: 7g
- Saturated Fat: 4g
- Unsaturated Fat: 2g
- Trans Fat: 0g
- Carbohydrates: 20g
- Fiber: 1g
- Protein: 2g
- Cholesterol: 20mg
Keywords: Easter sweets, cookies, dessert