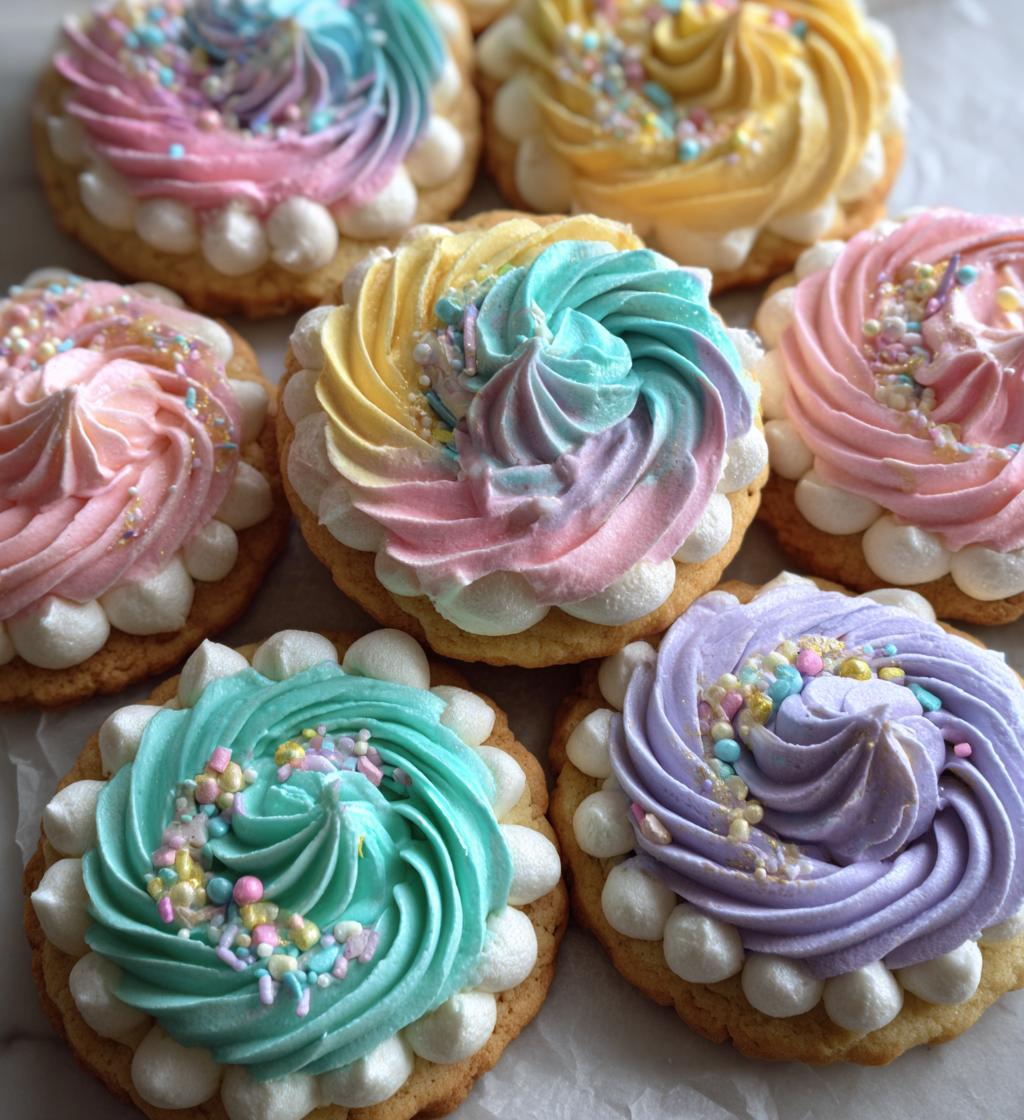
Ah, spring! It’s that magical time of year when the world bursts into color, and everything feels fresh and new. I absolutely adore making *spring cookies decorated with buttercream*, and I can’t wait to share my secrets with you! There’s something so delightful about baking cookies that not only taste amazing but also look like little pieces of art. These cookies are perfect for celebrating everything from Easter to garden parties, and they bring smiles to faces young and old.
Picture this: a platter of vibrant, beautifully decorated cookies, each one a canvas for your creativity. They’re not just cookies; they’re a way to express joy and creativity, making every gathering feel special. Plus, they’re super fun to make! Trust me, once you start decorating with that luscious buttercream frosting, you’ll feel like a kid again, and you’ll impress your friends and family with your artistic flair. So, let’s dive into this deliciously fun recipe together!
Ingredients List
Let’s gather everything we need to create these scrumptious *spring cookies decorated with buttercream*! Here’s what you’ll need:
- 2 cups all-purpose flour: Make sure to spoon and level the flour when measuring to keep the cookies from turning out too dense.
- 1 cup unsalted butter, softened: This should be at room temperature for easy creaming. I usually set mine out about an hour before I start baking.
- 1 cup granulated sugar: This adds sweetness and a lovely texture to our cookies.
- 1 large egg: It binds everything together, so don’t skip it! Make sure it’s at room temperature too.
- 1 teaspoon vanilla extract: A splash of vanilla adds a warm, aromatic flavor that makes these cookies even more irresistible.
- 1/2 teaspoon baking powder: This is our leavening agent that helps the cookies rise just right.
- 1/4 teaspoon salt: Don’t forget this! It enhances all the flavors and balances the sweetness.
- 2 cups buttercream frosting: You can make your own or use store-bought, but trust me, homemade is worth the effort!
- Food coloring for decoration: Get creative! Choose your favorite colors to bring these cookies to life.
Gather these ingredients, and you’ll be well on your way to making cookies that not only taste delightful but also look stunning on any spring table!
How to Prepare Spring Cookies Decorated Buttercream
Now that we have our ingredients ready, let’s get into the fun part of making these delightful *spring cookies decorated with buttercream*! I promise you, this process is just as enjoyable as the end result. Follow my step-by-step guide, and you’ll be on your way to cookie perfection!
Preheat and Prepare
First things first, let’s get that oven warmed up! Preheat it to 350°F (175°C). While that’s heating up, grab a couple of baking sheets and line them with parchment paper. This little trick helps the cookies bake evenly and prevents sticking, which means less clean-up for you later! It’s all about making this process as smooth as possible.
Mixing the Cookie Dough
Alright, it’s time to get mixing! In a large bowl, cream together the softened butter and granulated sugar. I usually use a hand mixer for this – it’s quick and gives a lovely fluffy texture. Beat them together until the mixture turns light and creamy, about 2-3 minutes. Then, add in that large egg and the vanilla extract, mixing until just combined.
In a separate bowl, whisk together the all-purpose flour, baking powder, and salt. Once you’ve done that, gradually add the dry ingredients into the wet mixture. I like to do this in thirds, mixing gently after each addition. This way, you get a perfectly combined dough without overmixing. You’ll know it’s ready when it all comes together and looks like a soft, slightly sticky dough!
Shaping and Baking the Cookies
Now comes the fun part! Grab a tablespoon or a cookie scoop, and roll the dough into balls, about 1-2 inches in diameter. Place them on your prepared baking sheets, leaving a little space between each one – they’ll spread out as they bake! You should be able to fit about 12 cookies on each sheet.
Pop them into the preheated oven and bake for 10-12 minutes, or until they’re lightly golden around the edges. Keep an eye on them towards the end, as ovens can vary. The moment you smell that sweet aroma wafting through your kitchen, you’ll know they’re close!
Cooling and Decorating
Once the cookies are done, take them out and let them cool on the baking sheets for about 5 minutes. Then, transfer them to a wire rack to cool completely. This step is super important – you don’t want to frost warm cookies, or your buttercream will just melt into a puddle!
Once they’re cool, it’s time to unleash your inner artist! Decorate your cookies with that luscious buttercream frosting and get creative with your food coloring. You can pipe flowers, swirls, or even fun patterns. The only limit is your imagination! If you want to add sprinkles or edible glitter, now’s the time to do it. Your spring celebration will be even brighter with these beautiful cookies!
Nutritional Information
Before you dive into enjoying these delightful *spring cookies decorated with buttercream*, it’s good to have a little insight into their nutritional profile. Please keep in mind that the nutrition values can vary based on the specific ingredients and brands you choose, so these numbers are approximate and not provided with absolute precision.
For each cookie, you can expect:
- Calories: 150
- Sugar: 10g
- Sodium: 50mg
- Fat: 7g
- Saturated Fat: 4g
- Unsaturated Fat: 2g
- Trans Fat: 0g
- Carbohydrates: 20g
- Fiber: 0g
- Protein: 2g
- Cholesterol: 20mg
So, indulge a little! After all, these cookies are all about celebrating the joys of spring and sharing sweet moments with loved ones.
Tips for Success
Now that you’re all set to whip up these delightful *spring cookies decorated with buttercream*, here are some of my favorite pro tips to ensure they turn out perfectly every time!
Cookie Storage Tips
To keep your cookies fresh and tasty, store them in an airtight container at room temperature. They’ll stay delicious for about a week, but trust me, they rarely last that long! If you want to keep them longer, you can freeze them without frosting for up to three months. Just make sure to wrap them tightly in plastic wrap before popping them in the freezer.
Choosing the Right Cookie Cutters
Using seasonal cookie cutters makes decorating even more fun! I love using flower shapes for springtime, but you can go wild with bunnies, eggs, or even butterflies. Just make sure to flour the cutters lightly to prevent the dough from sticking. If you’re feeling adventurous, why not try layering different shapes for a delightful cookie bouquet?
Perfecting the Buttercream Frosting
When it comes to buttercream, the consistency is key! If it’s too stiff, add a tiny splash of milk to make it easier to spread or pipe. If it’s too runny, just add a bit more powdered sugar until you reach the perfect fluffy texture. I like to use a piping bag for more intricate designs, but a simple spatula works wonders for spreading too.
Experimenting with Flavors
Don’t hesitate to get creative with flavors! You can add a teaspoon of lemon zest or almond extract to the cookie dough for a new twist. For the buttercream, try using different extracts or adding cocoa powder for chocolate frosting. The possibilities are endless, and that’s what makes baking so much fun!
Decorating Tips
When decorating, work in layers! Start with a base layer of frosting, let it set for a bit, and then add details. This technique helps prevent colors from bleeding into each other. And if you’re using sprinkles, add them right after frosting so they stick beautifully!
With these tips, you’re all set for cookie success! Happy baking, and may your kitchen be filled with the sweet smells of spring and laughter with loved ones!
Variations
Now that you’ve mastered the basic recipe for these delightful *spring cookies decorated with buttercream*, let’s get creative! There are so many fun ways to change things up and make these cookies your own. Here are some of my favorite variations to consider:
Different Flavors of Buttercream
Why stick with plain buttercream when you can jazz things up? Try adding different extracts to your frosting for unique flavors. Here are a few ideas:
- Chocolate Buttercream: Just add cocoa powder to your basic buttercream recipe for a rich, chocolatey twist!
- Lemon Buttercream: Incorporate lemon zest and a bit of lemon juice for a refreshing, zesty flavor that pairs beautifully with the cookies.
- Almond Buttercream: Swap vanilla extract for almond extract for a delightful nutty flavor that adds a lovely depth to your cookies.
- Strawberry Buttercream: Puree fresh strawberries and mix them in for a fruity, vibrant frosting that screams spring!
Seasonal Sprinkles and Decorations
Decorating is where the fun really shines! You can use a variety of toppings to elevate your cookies:
- Edible Flowers: For a touch of elegance, add edible flowers like pansies or violets on top of the buttercream. They look stunning and taste great!
- Colored Sugar: Instead of sprinkles, try using colored sugar for a sparkling effect that adds a sweet crunch.
- Chocolate Drizzle: Melt some chocolate and drizzle it over the frosted cookies for a decadent finish.
- Fruit Pieces: Top your cookies with small pieces of dried fruits like apricots or cranberries for added texture and flavor.
Cookie Shapes and Sizes
Experimenting with cookie shapes can bring a whole new vibe to your cookie platter. Use different cookie cutters to create:
- Flower Shapes: Perfect for spring, these can be layered with different colors of frosting to create beautiful bouquets.
- Bunny and Egg Shapes: Ideal for Easter celebrations, these shapes can be decorated with pastel colors and fun patterns.
- Mini Cookies: Make smaller versions of the cookies for bite-sized treats that are perfect for parties or snack platters.
With these variations, you can create a lineup of cookies that are not just delicious but also visually stunning. Let your creativity run wild, and have fun experimenting with flavors, decorations, and shapes. Happy baking!
Serving Suggestions
Now that you’ve baked up a batch of those gorgeous *spring cookies decorated with buttercream*, let’s talk about what to serve alongside them to really amp up the experience! The right accompaniments can turn a simple cookie plate into a delightful spring celebration.
Here are some of my favorite ideas:
- Fresh Lemonade: There’s nothing quite like a tall glass of refreshing lemonade to wash down your sweet cookies. The tartness complements the sweetness perfectly and adds a bright, sunny vibe to any gathering.
- Iced Tea: A lovely iced tea, whether sweetened or unsweetened, is a fantastic choice. Try infusing it with fresh mint or a hint of peach for a refreshing twist that pairs wonderfully with your cookies.
- Fruit Salad: A colorful fruit salad made with seasonal fruits like strawberries, blueberries, and kiwi not only looks beautiful on the table but also adds a light, refreshing taste that balances the richness of the cookies.
- Cheesecake Bites: For dessert lovers, mini cheesecake bites can be a delicious addition. Their creamy texture and tangy flavor provide a delightful contrast to your buttery, frosted cookies.
- Spring-themed Cupcakes: If you’re feeling extra festive, whip up some spring-themed cupcakes to accompany your cookies. Think floral designs or pastel colors that mirror the cookie decorations – it’s a sweet way to keep the theme going!
- Coffee or Tea: For a cozy touch, serve your cookies with a cup of freshly brewed coffee or tea. The warmth of the beverage pairs beautifully with the sweetness of the cookies, making it a comforting treat any time of day.
With these serving suggestions, you can create a delightful spread that enhances the joy of indulging in your beautiful spring cookies. So gather your friends and family, and enjoy every bite together!
FAQ Section
Got questions? No worries, I’ve got you covered! Here are some common queries about making *spring cookies decorated with buttercream*, along with my answers to help you out.
Can I make the cookie dough ahead of time?
Absolutely! You can prepare the cookie dough in advance and chill it in the refrigerator for up to 3 days. Just be sure to wrap it tightly in plastic wrap. When you’re ready to bake, let it sit at room temperature for about 10-15 minutes before rolling it into balls and baking. This makes it super convenient for last-minute gatherings!
What’s the best way to store my decorated cookies?
To keep your beautiful decorated cookies fresh, store them in an airtight container at room temperature. If you’ve got a lot of frosting on them, it’s best to put a piece of parchment paper between layers to prevent the decorations from smudging. They’ll stay delicious for about a week, but trust me, they won’t last that long!
Can I freeze the cookies?
What can I use if I don’t have butter for the frosting?
If you don’t have butter on hand, you can use shortening as a substitute for a buttercream frosting. It will create a slightly different texture, but it still tastes great! Additionally, you can use margarine, but it may alter the flavor a bit, so keep that in mind. Just make sure it’s softened, just like butter!
How do I achieve the perfect consistency for my buttercream frosting?
The key to perfect buttercream is to start with softened butter and gradually add powdered sugar. If it’s too stiff, add a splash of milk or cream until you reach your desired consistency. If it’s too runny, just add more powdered sugar. You want it to be smooth enough to spread or pipe, but thick enough to hold its shape!
Can I use different flavors of cookies for this recipe?
Absolutely! While this recipe is for classic vanilla cookies, you can definitely mix it up! Try adding cocoa powder for chocolate cookies, or even some citrus zest for a lemony twist. Just keep the proportions similar, and you’ll have fun variations that still work beautifully with the buttercream frosting!
With these FAQs, you’re now ready to tackle any challenges that come your way while making those delightful *spring cookies decorated with buttercream*. Happy baking, and enjoy every moment of it!
Print
spring cookies decorated buttercream for a Joyful Celebration
- Total Time: 32 minutes
- Yield: 24 cookies 1x
- Diet: Vegetarian
Description
Delicious spring cookies decorated with buttercream frosting.
Ingredients
- 2 cups all-purpose flour
- 1 cup unsalted butter, softened
- 1 cup granulated sugar
- 1 large egg
- 1 teaspoon vanilla extract
- 1/2 teaspoon baking powder
- 1/4 teaspoon salt
- 2 cups buttercream frosting
- Food coloring for decoration
Instructions
- Preheat your oven to 350°F (175°C).
- In a bowl, cream together butter and sugar until smooth.
- Add egg and vanilla extract, mix well.
- In another bowl, combine flour, baking powder, and salt.
- Gradually add dry ingredients to wet ingredients, mixing until combined.
- Roll dough into balls and place on a baking sheet.
- Bake for 10-12 minutes or until lightly golden.
- Let cookies cool completely.
- Decorate with buttercream frosting and food coloring.
Notes
- Store cookies in an airtight container.
- Use seasonal cookie cutters for fun shapes.
- Experiment with different frosting colors.
- Prep Time: 20 minutes
- Cook Time: 12 minutes
- Category: Dessert
- Method: Baking
- Cuisine: American
Nutrition
- Serving Size: 1 cookie
- Calories: 150
- Sugar: 10g
- Sodium: 50mg
- Fat: 7g
- Saturated Fat: 4g
- Unsaturated Fat: 2g
- Trans Fat: 0g
- Carbohydrates: 20g
- Fiber: 0g
- Protein: 2g
- Cholesterol: 20mg
Keywords: spring cookies, decorated cookies, buttercream frosting, cookie recipe